2023. 1. 23. 23:42ㆍ카테고리 없음
1/23
* 로깅 (system.pirnt.out X)
- 로그 선언
@RestController
public class LogTestController {
    private final Logger log = LoggerFactory.getLogger(getClass());

    @RequestMapping("/log-test")
    public String LogTest(){
        String name = "Spring";

        log.trace("trace log={}", name);
        log.debug("debug log={}", name);
        log.info(" info log={}", name);
        log.warn(" warn log={}", name);
        log.error(" error log={}", name);

        return "ok";
    }
}
* private final Logger log = LoggerFactory.getLogger(getClass()) -> @Slf4j 로 변경 가능
* @RestController
- @Controller 반환 값이 String 이면 뷰 이름으로 인식된다. 그래서 뷰를 찾고 뷰가 랜더링 된다.
- 하지만 @RestController은 HTTP 메시지 바디에 바로 입력된다.
* 로그 출력 포멧
2023-01-23 16:03:20.031 INFO 15124 --- [nio-8080-exec-1] hello.springmvc.basic.LogTestController : info log=Spring
2023-01-23 16:03:20.032 WARN 15124 --- [nio-8080-exec-1] hello.springmvc.basic.LogTestController : warn log=Spring
2023-01-23 16:03:20.032 ERROR 15124 --- [nio-8080-exec-1] hello.springmvc.basic.LogTestController : error log=Spring
* 로그 레벨
- TRACE > DEBUG > INFO > WARN > ERROR
- 개발 서버는 debug
- 운영 서버는 info
- 로그 설정 -> logging.level.hello.springmvc=debug
=========================================================================
* 경로 변수
@GetMapping("/mapping/{userId}")
public String mappingPath(@PathVariable("userId") String data) {
    log.info("mappingPath userId={}", data);

    return "ok";
}
@PathVariable -> 매칭 부분 편리하게 사용
ex) mapping/userA
-------> mappingPath userId=userA
* 경로변수 다중 사용
@GetMapping("/mapping/users/{userId}/orders/{orderId}")
public String mappingPath(@PathVariable String userId, @PathVariable Long
        orderId) {
    log.info("mappingPath userId={}, orderId={}", userId, orderId);
    return "ok";
}
--> users의 userId 의 주문중 주문번호 조회
=========================================================================
* consumes, produces
@PostMapping(value="/mapping-consume", consumes = "application/json")
public String mappingConsumes(){
    log.info("mappingConsumes");
    return "ok";
}

@PostMapping(value="/mapping-produce", produces = "text/html")
public String mappingProduces(){
    log.info("mappingProduces");
    return "ok";
}
consumes -> HTTP 요청의 Content-Type 헤더를 기반으로 미디어 타입으로 매핑
produces -> HTTP 요청의 Accept 헤더를 기반으로 미디어 타입으로 매핑
=========================================================================
* request 파라미터 받기 (단계별)
@Slf4j
@Controller
public class RequestParamController {


    @RequestMapping("/request-param-v1")
    public void requestParamV1(HttpServletRequest request, HttpServletResponse response) throws IOException {
        String username = request.getParameter("username");
        int age = Integer.parseInt(request.getParameter("age"));

        log.info("username={}, age={}", username, age);

        response.getWriter().write("ok");
    }

    @ResponseBody
    @RequestMapping("/request-param-v2")
    public String requestParamV2(@RequestParam("username") String memberName,
                                 @RequestParam("age") int memberAge){

        log.info("username={}, age={}", memberName, memberAge);
        return "ok";
    }

    @ResponseBody
    @RequestMapping("/request-param-v3")
    public String requestParamV3(@RequestParam String username,
                                 @RequestParam int age){

        log.info("username={}, age={}", username, age);
        return "ok";
    }

    @ResponseBody
    @RequestMapping("/request-param-v4")
    public String requestParamV4(String userName, int age){

        log.info("username={}, age={}", userName, age);
        return "ok";
    }
}
* v1 -> request.getParameter(파라미터)
* v2 -> @RequestParam(파라미터) 타입 변수명
* v3 -> @RequestParam 타입 변수명 (변수명과 파라미터명이 같아야함)
* v4 -> 타입 변수명 (변수명과 파라미터명이 같아야함)
* @RequestParam(required = true) --> 기본값, 파라미터가 필수적으로 있어야 함
@ResponseBody
@RequestMapping("/model-attribute-v1")
public String modelAttributeV1(@ModelAttribute HelloData helloData) {

    log.info("username={}, age={]", helloData.getUsername(), helloData.getAge());

    return "ok";
}
* @ModelAttribute -> 해당 객체의 getter, setter 조회해서 자동으로 모두 실행됨.
* @ModelAttribute 생략 가능...
=========================================================================
* 위의 경우에는 GET 쿼리 파라미터 , POST form 전송 방식의 경우 (RequestParam, ModelAttribute)
* 위를 제외한 나머지는 HttpEntity 사용
* 단계적으로
@Slf4j
@Controller
public class RequestBodyStringController {

    @PostMapping("/request-body-string-v1")
    public void requestBodyStringV1(HttpServletRequest request,
                                  HttpServletResponse response) throws IOException {
        ServletInputStream inputStream = request.getInputStream();
        String messageBody = StreamUtils.copyToString(inputStream, StandardCharsets.UTF_8);

        log.info("messageBody={}", messageBody);

        response.getWriter().write("ok");
    }

    @PostMapping("/request-body-string-v2")
    public void requestBodyStringV2(InputStream inputStream, Writer responseWriter) throws IOException {
        String messageBody = StreamUtils.copyToString(inputStream, StandardCharsets.UTF_8);
        log.info("messageBody={}", messageBody);
        responseWriter.write("ok");
    }

    @PostMapping("/request-body-string-v3")
    public HttpEntity<String> requestBodyStringV3(HttpEntity<String> httpEntity) throws IOException {
        String messageBody = httpEntity.getBody();
        log.info("messageBody={}", messageBody);

        return new HttpEntity<>("ok");
    }
}
- HTTP header, body 정보를 편리하게 조회 가능
- 응답에도 사용 가능 (view 조회 X)
* 최종
@ResponseBody
@PostMapping("/request-body-string-v4")
public String requestBodyStringV4(@RequestBody String messageBody) throws IOException {
    log.info("messageBody={}", messageBody);

    return "ok";
}
=========================================================================
위와 같은 내용
String -> json
* @RequestBody 요청
-> JSON 요청 -> HTTP 메시지 컨버터 -> 객체
* @ResponseBody 응답
-> 객체 -> HTTP 메시지 컨버터 -> JSON 응답
@Slf4j
@Controller
public class RequestBodyJsonController {

    private ObjectMapper objectMapper = new ObjectMapper();

    @PostMapping("/request-body-json-v1")
    public void requestBodyJsonV1(HttpServletRequest request, HttpServletResponse response) throws IOException {
        ServletInputStream inputStream = request.getInputStream();
        String messageBody = StreamUtils.copyToString(inputStream, StandardCharsets.UTF_8);

        log.info("messageBody={}", messageBody);
        HelloData helloData = objectMapper.readValue(messageBody, HelloData.class);

        log.info("username={}, age={}", helloData.getUsername(), helloData.getAge());

    }

    @ResponseBody
    @PostMapping("/request-body-json-v2")
    //@RequestBody -> Http Body 를 바로 String 타입으로 받을 수 있음.

    public String requestBodyJsonV2(@RequestBody String messageBody) throws IOException {

        log.info("messageBody={}", messageBody);
        HelloData helloData = objectMapper.readValue(messageBody, HelloData.class);

        log.info("username={}, age={}", helloData.getUsername(), helloData.getAge());

        return "ok";
    }

    @ResponseBody
    @PostMapping("/request-body-json-v3")
    public String requestBodyJsonV3(@RequestBody HelloData helloData){
        log.info("username={}, age={}", helloData.getUsername(), helloData.getAge());
        return "ok";
    }

    @ResponseBody
    @PostMapping("/request-body-json-v4")
    public String requestBodyJsonV4(HttpEntity<HelloData> httpEntity){
        HelloData data = httpEntity.getBody();
        log.info("username={}, age={}", data.getUsername(), data.getAge());
        return "ok";
    }

    @ResponseBody
    @PostMapping("/request-body-json-v5")
    public HelloData requestBodyJsonV5(@RequestBody HelloData helloData){
        log.info("username={}, age={}", helloData.getUsername(), helloData.getAge());
        return helloData;
    }
}
=========================================================================
*** 스프링 부트는 기본 뷰 템플릿 경로를 제공한다.
- src/main/resources/templates
* 뷰 템플릿을 호출하는 컨트롤러
@Controller
public class ResponseViewController {

    @RequestMapping("response-view-v1")
    public ModelAndView responseViewV1(){
        ModelAndView mav = new ModelAndView("response/hello")
                .addObject("data", "hello!");
        return mav;
    }


    @RequestMapping("response-view-v2")
    public String responseViewV2(Model model){
        model.addAttribute("data", "hello!");
        return "response/hello";
    }
}
=========================================================================
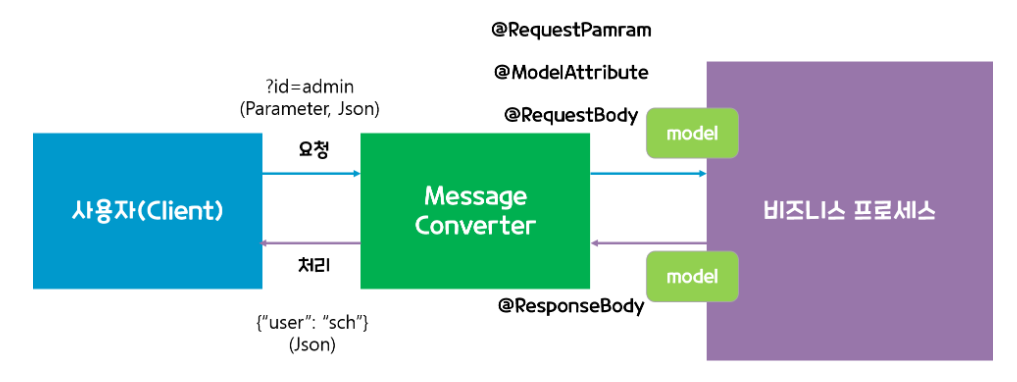
* HttpMessageConverter 용도
- HTTP API처럼 JSON 데이터를 HTTP 메시지 바디 내 직접 읽거나 쓰는 경우 사용
- @ResponseBody 어노테이션을 사용할 때 HTTP Body 내 문자 내용을 직접 반환하므로 HttpMessageConverter가 동작
- String 문자 처리에는 StringHttpMessageConverter, 객체 처리에는 MappingJackson2HttpMessageConverter 사용
- 이외에도 다양한 HttpMessageConverter가 존재
* 응답의 경우 클라이언트의 HTTP Accept 헤더와 서버 컨트롤러의 반환 타입을 조합해 MessageConverter가 선택됨
* 스프링 MVC의 HttpMessageConverter 적용 사례
- HTTP 요청: @RequestBody, HttpEntity(RequestEntity)
- HTTP 응답: @ResponseBody, HttpEntity(ResponseEntity)
* 주로 사용하는 메시지 컨버터 세 가지 (우선순위 순)
- ByteArrayHttpMessageConverter
- StringHttpMessageConverter
- MappingJackson2HttpMessageConverter
* HTTP는 언제 사용될까 ?

- 컨트롤러를 처리하는 RequestMappingHandlerAdapter가 ArgumentResolver를 호출하면서 필요로 하는 다양한 파라미터의 값을 생성한 후 컨트롤러를 호출하며 파라미터를 넘겨줌 (사진 내 1번과 2번 과정)
- ReturnValueHandler는 응답 값을 변환하고 처리하는데, 컨트롤러에서 String으로 뷰의 논리적 이름만 반환하더라도 동작하는 이유가 ReturnValueHandler 덕분 (사진 내 3번 과정)